
Did you know that you can travel just about anywhere in the world right from your equipment? Outside of iFIT’s many Global Workouts with iFIT Trainers, you can also create your own map-based workout routes using Google Maps™!* Revisit your childhood neighborhood, favorite vacation destinations, alma mater, and more. With Google Maps™️, the possibilities are endless for your next workout. Plus, these workouts count toward your iFIT Milestones!
Ready to get started? First, we’ll need to create the route you’d like to use for your workout. Here’s how to map it out:
STEP 1
Log in to your iFIT account on your iFIT-enabled equipment or the iFIT tablet app.
STEP 2
At the bottom of the iFIT home screen, locate and tap the Create map icon.
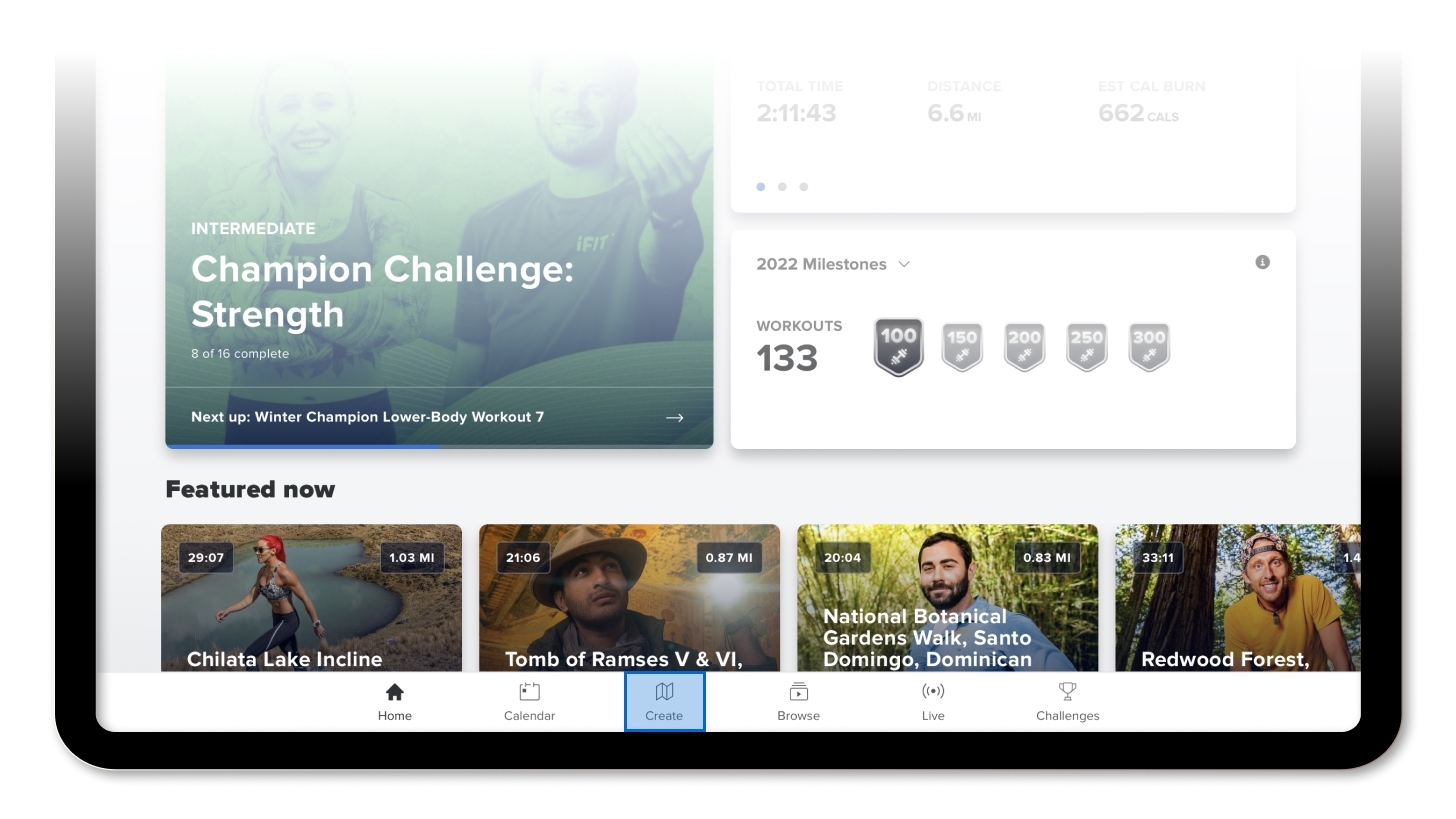
On older tablet displays, menu navigation may differ. Consult your user’s manual for instructions specific to your machine’s model. (If you need a copy of your user’s manual, you can download one from the My Equipment section of your my.ifit.com profile or by entering your model information at this link and clicking View Manual. Your model number and/or model name can be found on the serial number decal on your machine.)
STEP 3
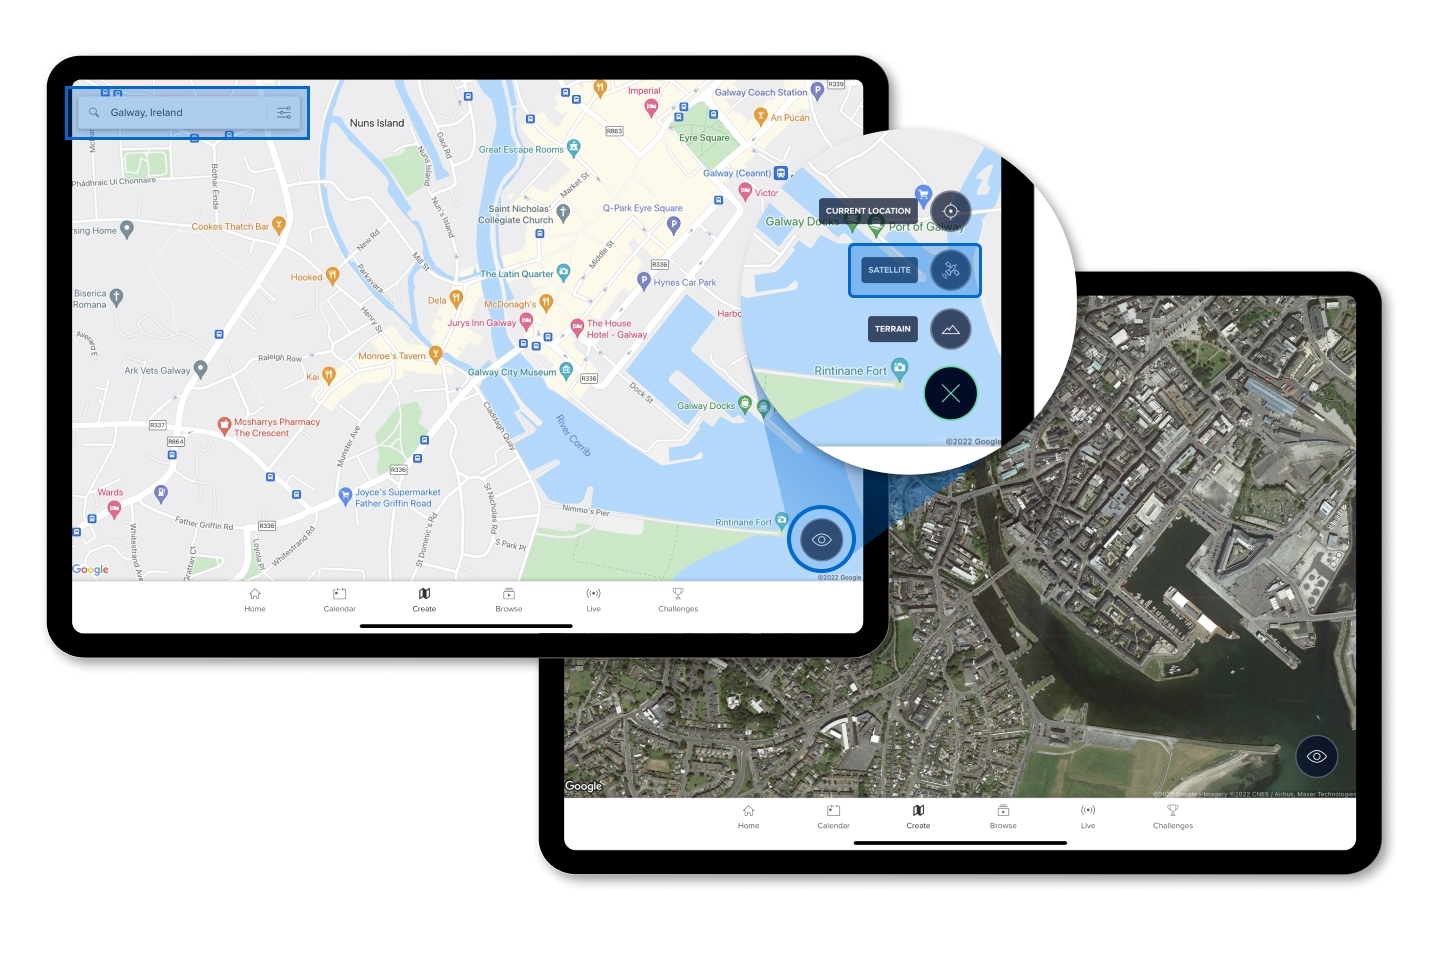
Your screen will display a Google Maps™️ view of a featured location somewhere in the world. Use the search bar to type in your desired location in the top left corner.
- Use the touchscreen to drag the map to your desired location (You can do this by swiping your finger in the direction you want the view to shift) or zoom in or out on an area (by moving two fingers away from or toward each other on the screen).
- Press the eye icon in the bottom right corner of your screen to toggle between the basic map view and the Google Maps™ satellite view.
STEP 4
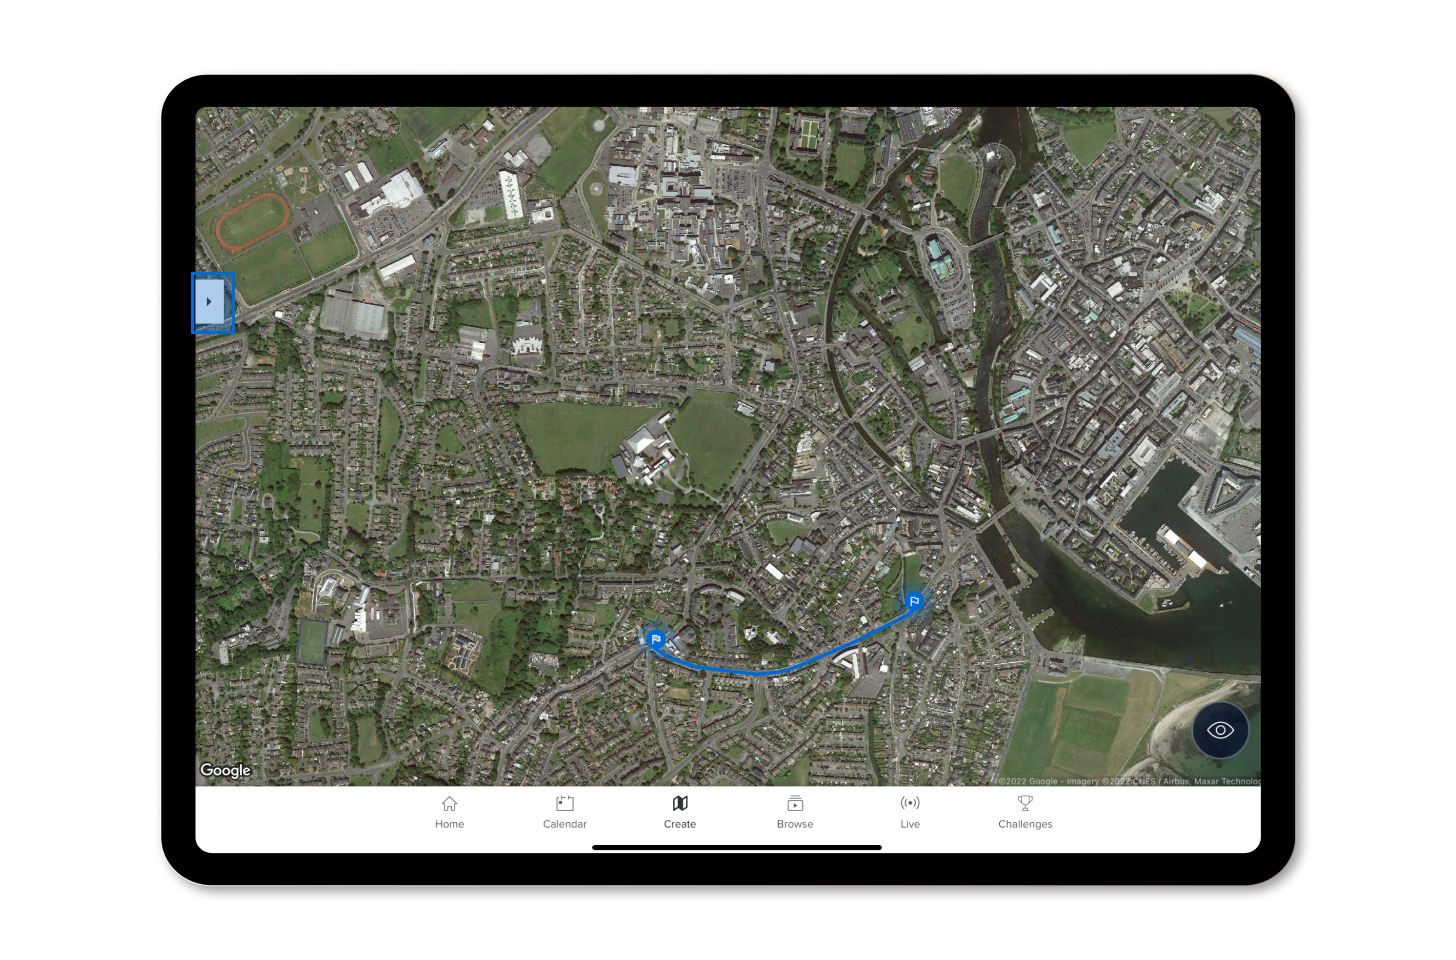
Once you’ve navigated to the location where you want your workout to take place, touch the screen at the spot where you want your route to begin. The starting point for your route will now appear as a flag.
- Use the touchscreen to move the map to find and touch the point where you want your route to end.
- You can touch as many successive points as you want on the map to draw a more complex route rather than a basic start and end point.
- Helpful tip: Press the details button (which looks like three lines with circles on iFIT-enabled equipment or a pull-out carrot on the iFIT tablet app) by the search bar in the top left corner of your screen to open more details and options for your workout.
STEP 5
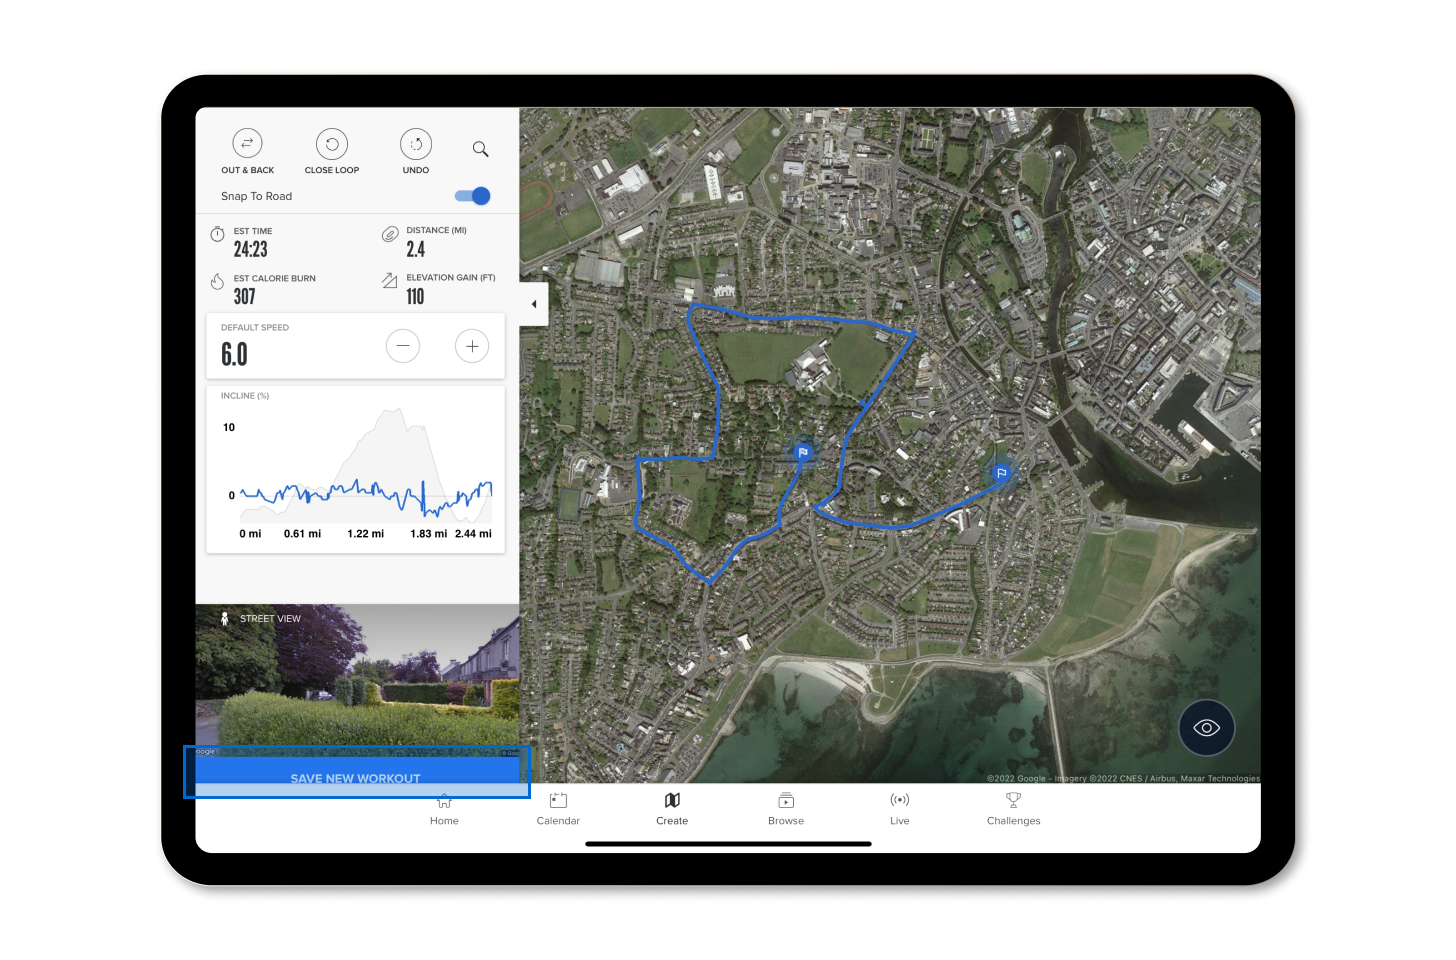
- The details box displays the elevation and distance statistics for your current route. As you make changes to your route, these statistics will update automatically based on information from the Google Maps™ database.
- Press the Snap To Road button to toggle your route between a direct path connecting your selected points and a path that stays on the mapped roads nearest to your selected points.
- Press Out & Back to set your route to automatically go from your chosen start point to your end point and then back to your start point.
- Press Close Loop to set your route to automatically draw a loop so that you start and end at your chosen start point.
- Press Undo to undo your most recent map or settings selection.
- You can also adjust your default or target speed (if applicable).
STEP 6
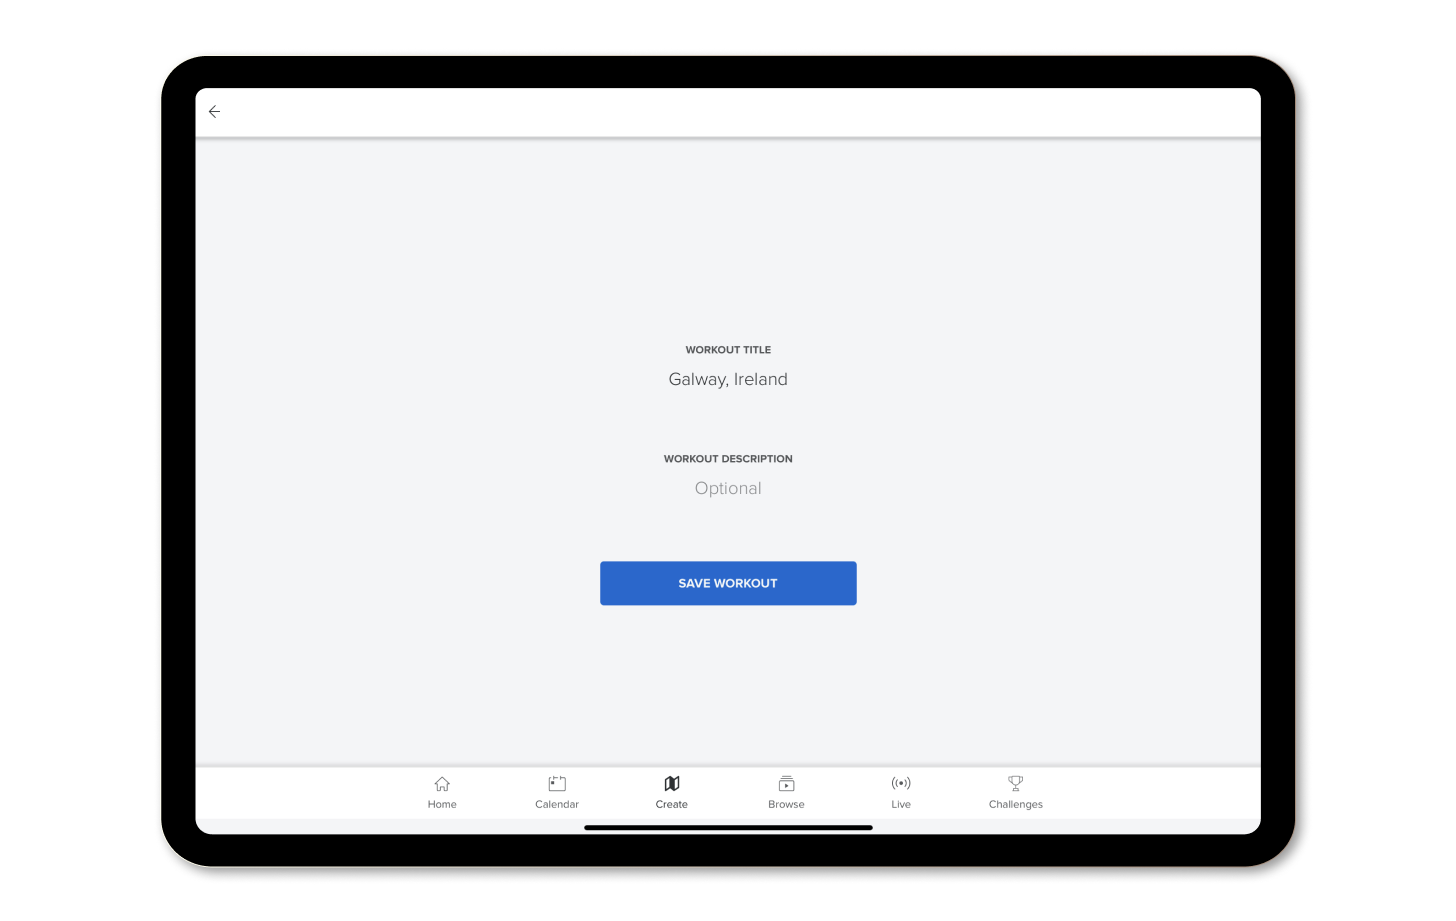
When you’re satisfied with the route, press Save New Workout. You may change the title or the workout description at this time before saving.
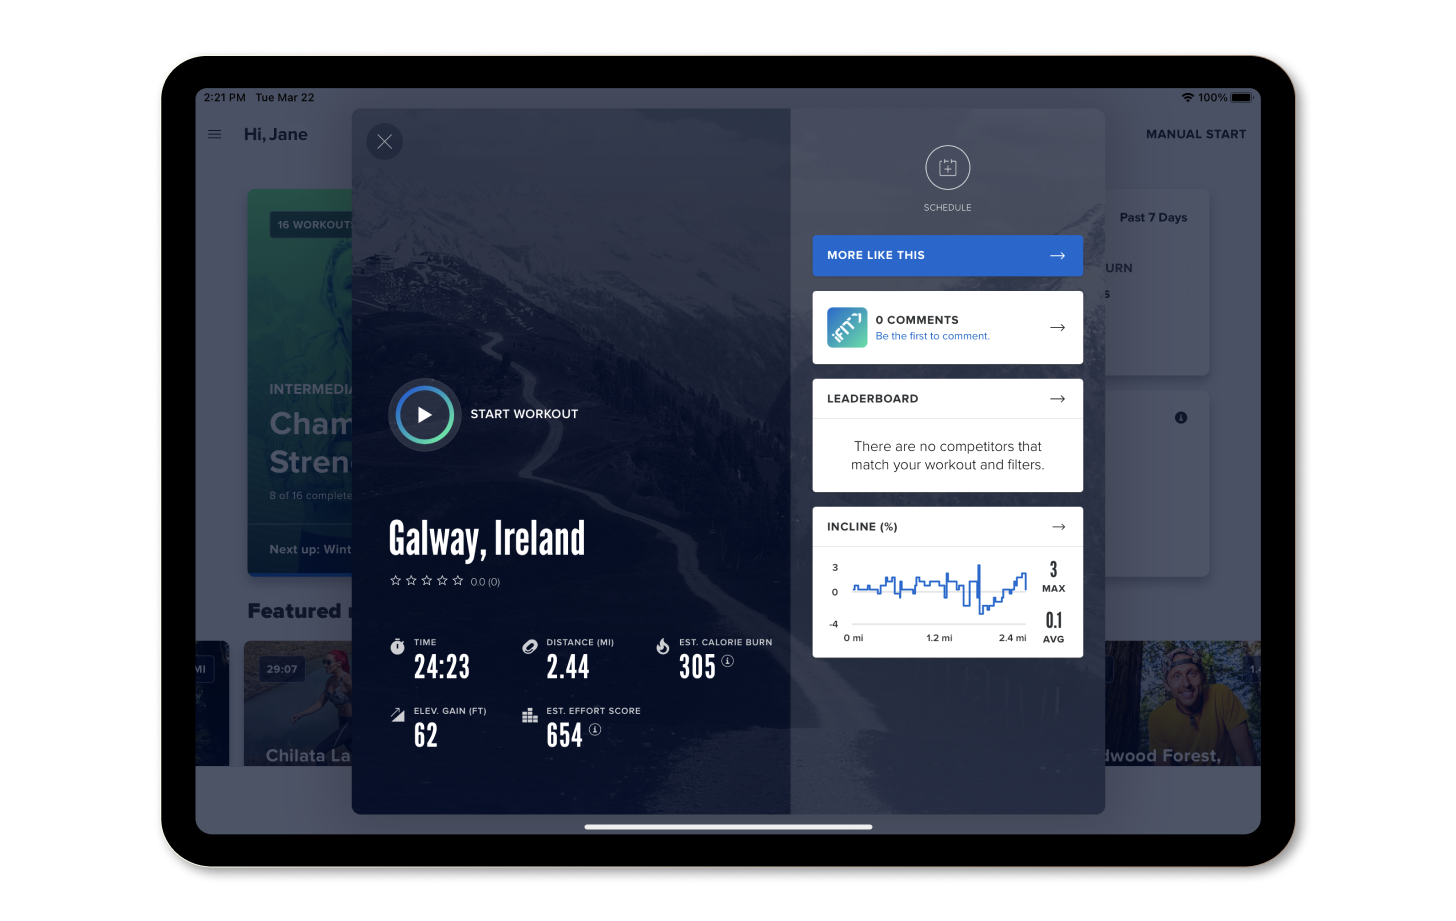
You’ve now created your own map-based workout! Get going by tapping Start Workout to begin the workout you just made. Rather do your workout later instead? Press Schedule to schedule a date on your calendar for when you’d like to work out. Keep track of this workout and those you create in the future by pressing Favorite to save them to your list of favorites in iFIT. Work out in places you love or have never been to and earn iFIT Milestones along the way!
*Note: Only those locations that have been logged in the global Google Maps™ database will be available.
Disclaimer: This blog post is not intended to replace the advice of a medical professional. The above information should not be used to diagnose, treat, or prevent any disease or medical condition. Please consult your doctor before making any changes to your diet, sleep methods, daily activity, or fitness routine. iFIT assumes no responsibility for any personal injury or damage sustained by any recommendations, opinions, or advice given in this article. Always follow the safety precautions included in the owner’s manual of your fitness equipment.
You might also like

New Feature: Connect iFIT to your Favorite Fitness Apps
Whether you’re out running your favorite trail or cycling at home, every single workout is important. We believe tracking your fitness journey in a single location is a key component to chasing your goals. You can now connect your iFIT account with Apple Health™, Garmin® Connect, Google Fit™, and Strava, so all of your workouts are in one place! Note: Only iFIT workouts from the iFIT Library will count toward your iFIT Milestones. Important update 12/31/2025: Google Fit™ is a deprecated service and is no longer supprted by Google. As a result, iFIT no longer supports new Google Fit connections. We’re actively working toward supporting Google Health Connect, Google’s replacement platform, in a future update. Ready to get connected? Here’s how you can connect your favorite fitness apps to iFIT. Apple Health Garmin Connect Google Fit™ Strava How to connect iFIT to Apple Health: Launch the iFIT app on your iPhone.Tap the three lines in the top left corner to access the menu, then tap on Settings.From Settings, navigate to Connected Apps.On the Connected Apps screen, select Apple Health, then tap Connect.You'll be taken to the Health Access page where you can enable sharing data from iFIT to Health. You can control which types of information iFIT will read and write to Health. How to connect your iFIT and Garmin Connect accounts: Launch the iFIT app on your iPhone or Android phone. Tap the three lines in the top left corner to access the menu, then tap on Settings.From Settings, navigate to Connected Apps.On the Connected Apps screen, select Garmin Connect, then tap Connect.Sign in to your Garmin Connect account.After signing in to your Garmin Connect account, toggle on the preference to share activity data from Garmin Connect to iFIT.Tap the Agree button to connect your iFIT and Garmin Connect accounts.After connecting, you can set your desired preferences to automatically sync your Garmin Connect activities to your iFIT account. Important update 12/31/2025: Google Fit™ is a deprecated service and is no longer supprted by Google. As a result, iFIT no longer supports new Google Fit connections. We’re actively woring toward supporting Google Health Connect, Google’s replacement platform, in a future update.How to connect iFIT to Google Fit™: Launch the iFIT app on your iPhone or Android phone.Tap the three lines in the top left corner to access the menu, then tap on Settings.From Settings, navigate to Connected Apps.On the Connected Apps screen, select Google Fit™, then tap Connect.You’ll be prompted to select the Google account you would like to connect. Tap the Allow button to allow iFIT access to your Google Fit™ account.After connecting, you can set your desired preferences to automatically sync activities between iFIT and Google Fit™. How to connect your iFIT and Strava accounts: Launch the iFIT app on your iPhone or Android phone. Tap the three lines in the top left corner to access the menu, then tap on Settings.From Settings, navigate to Connected Apps.On the Connected Apps screen, select Strava, then tap Connect.Sign in to your Strava account.After signing in to your Strava account, tap the Authorize button to connect your iFIT and Strava accounts.After connecting, you can set your desired preferences to automatically sync your activities between your iFIT and Strava accounts. We hope you enjoy this new feature as you chase your fitness goals with iFIT! Google Fit™ is a trademark of Google LLC. Disclaimer: This blog post is not intended to replace the advice of a medical professional. The above information should not be used to diagnose, treat, or prevent any disease or medical condition. Please consult your doctor before making any changes to your diet, sleep methods, daily activity, or fitness routine. iFIT assumes no responsibility for any personal injury or damage sustained by any recommendations, opinions, or advice given in this article. Always follow the safety precautions included in the owner’s manual of your fitness equipment.
September 2, 2021

Be Active. Be Healthy. Be Happy: The Fitness Month Challenge
May is National Fitness Month, and we’re here to celebrate with you! Join us, and make time for your health with the inaugural Fitness Month Challenge! Whether you want to restart your routine or push yourself to conquer new goals, join your favorite iFIT Trainers for 6 weeks of “mini-Challenges,” starting with National Fitness Month and ending on Global Running Day on June 7. Complete the workouts from your selected level for each week of the Fitness Month Challenge and earn a digital reward in your Trophy Case to share with your family and friends! At the end of the Fitness Month Challenge, check your email for an exclusive one-time offer to purchase a commemorative Fitness Month Challenge t-shirt, so you can show off your success! See the Fitness Month Challenge FAQs section for more details. Read on to learn more about our weekly mini-Challenges! Week 1: EnergyWeek 2: CommunityWeek 3: MindWeek 4: ElevateWeek 5: NatureWeek 6: MovementFitness Month Challenge FAQs Week 1: Energy To kick off the Fitness Month Challenge, energize your body with workouts under 20 minutes to get outside and take in the fresh air in a flash! Complete the workouts from your selected level for Week 1 between May 1 - May 7 and earn a digital reward in your Trophy Case. Stay tuned for Week 2, and discover how having #squadgoals can transform your fitness journey. Here are this week’s mini-Challenges: Treadmill and elliptical workouts Walking: Give your body a boost with two energizing walking workouts, each under 20 minutes. Join iFIT Trainers Elyse Miller, John Peel, and Michael Phelps in Nashville and Maui! Join Week 1: Energy (Walking) Running: Looking for an energizing run but short on time? Join iFIT Trainers Alex Morgan and Jonnie Gale in Florida and Iceland for 2 running workouts, each under 20 minutes! Join Week 1: Energy (Running) Bike workouts Casual Riding: Join iFIT Trainers Gideon Akande and Nicole Meline and feel energized in Bermuda and Montana! These 2 bike workouts are under 20 minutes, so make every moment count. Join Week 1: Energy (Casual Riding) Amped Cycling: In a time crunch but want an energizing ride? Join iFIT Trainers Casey Zaugg and Richard Biglia for 2 cycling workouts, each under 20 minutes! Join Week 1: Energy (Amped Cycling) Rower workouts Rowing: Have 20 minutes to spare? Hop on your rower and get energized with iFIT Trainers Alex Silver-Fagan and James Stephenson! Learn to row longer and stronger while getting a fantastic workout in. Join Week 1: Energy (Rowing) Strength workouts Strength: Join iFIT Trainers Elyse Miller and Shelley Dawson and strengthen your body with 2 workouts under 20 minutes! Start with a total-body workout and wrap up with an energizing Vinyasa yoga flow. Join Week 1: Energy (Strength) Digital Reward Want more quick workouts? Check out our new Shorts Collection on the iFIT mobile app or your NordicTrack or ProForm equipment coming soon! Week 2: Community Having a Community in your corner makes exercise more motivating and fun! Before Mother’s Day, work out with your favorite iFIT Trainers who are also moms. Complete the workouts from your selected level for Week 2 of the Fitness Month Challenge between May 8 - 14, 2023, and earn a digital reward in your Trophy Case! Stay tuned for Week 3, and learn why your physical and mental health is inseparable. Here are this week’s mini-Challenges: Treadmill and elliptical workouts Walking: Here’s to all the strong women, from our trainers to our Community! Join Stacie Clark and Sanya Richards-Ross for 2 walking workouts in Aruba and Jamaica. Join Week 2: Community (Walking) Running: Celebrate our Community and our female trainers in Florida and Croatia! iFIT Trainers Elyse Miller and Kelsey Sheahan coach you with 2 running workouts to guide your fitness journey. Join Week 2: Community (Running) Bike workouts Casual Riding: Join the iFIT Community and moms around the world to inspire your goals! iFIT Trainers Ashley Paulson and Heather Jenson coach you on your fitness journey with 2 inspiring bike workouts. Join Week 2: Community (Casual Riding) Amped Cycling: iFIT Trainers Ashley Paulson and Stacie Clark lead the way and guide you! Join our Community with 2 cycling workouts to inspire you to reach your goals. Join Week 2: Community (Amped Cycling) Rower workouts Rowing: iFIT Trainers Susan Francia and Anja Garcia are with you every step of the way with 2 rowing workouts! Practice your speed and endurance and learn how Community can take your goals to the next level. Join Week 2: Community (Rowing) Strength workouts Strength: Train with our Community as iFIT Trainers Kelsey Sheahan and Kayla Itsines coach you to a better you with 2 strength workouts that will tone your entire body! Join Week 2: Community (Strength) Digital Reward Want to see more of iFIT’s amazing moms in action? Check out our Mother’s Day blog and our “Celebrating Moms” row on the iFIT mobile app or your NordicTrack or ProForm equipment! Week 3: Mind Explore the connection between your body and mind! Take care of yourself during Mental Health Awareness Month with workouts that will revitalize you—inside and out. Complete the workouts from your selected level for Week 3 of the Fitness Month Challenge between May 15 - 21, 2023, and earn a digital reward in your Trophy Case. Stay tuned for Week 4, and elevate your fitness to new places—and new heights! Here are this week’s mini-Challenges: Treadmill and elliptical workouts Walking: Take time for your well-being with iFIT Trainers Adam Sinicki and Dr. Jarrod Spencer! On 2 walking workouts, you’ll learn the importance of mental health for your overall health. Join Week 3: Mind (Walking) Running: Grab your shoes and join iFIT Trainers Adam Sinicki and Dewayne Montgomery for 2 running workouts! You’ll strengthen your body and mind from England to Hawaii to live a healthier life. Join Week 3: Mind (Running) Bike workouts Casual Riding: Make time for you with 2 bike workouts to calm your mind! Ride with iFIT Trainers Shauna Shapiro and George Hincapie in Utah and Hawaii and learn how mental well-being strengthens your body. Join Week 3: Mind (Casual Riding) Amped Cycling: Join iFIT Trainers Shauna Shapiro and Brandon Lyons on 2 cycling workouts and explore mindfulness to live life with purpose! Join Week 3: Mind (Amped Cycling) Rower workouts Rowing: iFIT Trainers Thalia Ayres Randolph and Dr. Eva Selhub teach you to relax your mind, from finding inner balance to the importance of proper nutrition. Join Week 3: Mind (Rowing) Strength workouts Strength: Take some time for self-care today and feel good—body and mind! Join iFIT Trainers Kelsey Wells and Faith Hunter for an upper-body workout and meditation that will boost your strength and confidence. Join Week 3: Mind (Strength) Digital Reward Want to learn more about mindfulness? Check out the Mind section on the iFIT mobile app and our Q&A with iFIT Trainer Casey Gilbert. Week 4: Elevate Elevating your fitness goals means reaching new heights! Experience mountain vistas and hilltop views and aim higher on your journey. Complete the workouts from your selected level for Week 4 of the Fitness Month Challenge between May 22 - 28, 2023, and earn a digital reward in your Trophy Case. Stay tuned for Week 5, and take in the fresh air as we go outside and explore nature’s tropical beauty. Here are this week’s mini-Challenges: Treadmill and elliptical workouts Walking: Elevate your fitness with iFIT Trainers Heather Jenson and Graham McTavish! Explore Hawaii and Scotland on 2 hiking workouts and find your peak performance. Join Week 4: Elevate (Walking) Running: Raise the bar on your health with 2 running workouts led by iFIT Trainers Tommy Rivs Puzey and Ashley Paulson! Explore Easter Island and Japan and elevate your goals. Join Week 4: Elevate (Running) Bike workouts Casual Riding: Elevate your fitness to new heights with iFIT Trainers John Peel and Jenny Fletcher! Join them for 2 bike workouts in Costa Rica and Southern California. Join Week 4: Elevate (Casual Riding) Amped Cycling: It’s time to elevate your fitness to new destinations! iFIT Trainers Ryan Petry and Tommy Rivs Puzey lead the way on 2 cycling workouts, so get ready for a thrilling adventure. Join Week 4: Elevate (Amped Cycling) Rower workouts Rowing: From Slovenia to Montana, join iFIT Trainers Alex Gregory and Susan Francia for 2 rowing workouts! Elevate your power and speed before enjoying a sunset row to boost your goals. Join Week 4: Elevate (Rowing) Strength workouts Strength: Travel to Iceland and Portugal with iFIT Trainers Jonnie Gale and Hannah Eden and elevate your routine! Tone your body with 2 strength workouts and explore new destinations. Join Week 4: Elevate (Strength) Digital Reward Check out the iFIT Library and explore more workouts featuring inclines and majestic mountain views! Week 5: Nature Return to nature and gain a new perspective on your fitness goals! From boosting your mood to revving up your immune system and more, the benefits are endless. Complete the workouts from your selected level for Week 5 of the Fitness Month Challenge between May 29 - June 4, 2023, and earn a digital reward in your Trophy Case. Stay tuned for Week 6, and cap off the Fitness Month Challenge with dynamic movement to rejuvenate and revitalize you. Here are this week’s mini-Challenges: Treadmill and elliptical workouts Walking: Soak up the sun in Saint Lucia and Oahu! iFIT Trainers Chris Clark and Jamie Mitchell take you on 2 walking workouts as you learn to connect with nature. Join Week 5: Nature (Walking) Running: Experience nature in Tanzania and French Polynesia! iFIT Trainers Knox Robinson and John Peel take you on an adventure with 2 running workouts. Join Week 5: Nature (Running) Bike workouts Casual Riding: Head outside and enjoy nature with iFIT Trainers Ashley Davis and John Peel in Hawaii and French Polynesia! Breathe in the summer air with 2 bike workouts and feel those good vibrations. Join Week 5: Nature (Casual Riding) Amped Cycling: Put on your shades and hit the beach with iFIT Trainers Richard Biglia and Casey Zaugg! See nature’s beauty in Puerto Rico and Vietnam on 2 cycling workouts. Join Week 5: Nature (Amped Cycling) Rower workouts Rowing: Explore Martinique and French Polynesia with iFIT Trainers Alex Gregory and Kevin Scott for 2 rowing workouts! Take in nature’s tropical vibes while challenging your speed and strength. Join Week 5: Nature (Rowing) Strength workouts Strength: Get out in nature and hit the beach with iFIT Trainers Hannah Eden and Chris Clark! Improve your flexibility and mobility in Iceland and Hawaii. Join Week 5: Nature (Strength) Digital Reward Week 6: Movement You were born to get up and go, so experience the power of movement for your body, mind, and overall health! As we wrap up the Fitness Month Challenge, June 7 marks Global Running Day! So, lace up your sneakers and check out our running workouts on the iFIT app to celebrate with us! Complete the workouts from your selected level for Week 6 of the Fitness Month Challenge between June 5 - 7, 2023, and earn a digital reward in your Trophy Case. Here is this week’s mini-Challenge: Move your body with iFIT Trainers Keith Mitchell and Gerell Webb! Enjoy a dynamic yoga workout and finish with mobility stretching to unwind. This mini-Challenge is available for all modalities and levels. Join Week 6: Movement Digital Reward Fitness Month Challenge FAQs How much time do I have to complete each mini-Challenge? For your selected level, you will have 1 week to complete the mini-Challenge for Weeks 1 - 5 and 3 days to complete the mini-Challenge for Week 6. The schedule is as follows: Week 1: May 1 - 7 Week 2: May 8 - 14 Week 3: May 15 - 21 Week 4: May 22 - 28 Week 5: May 29 - June 4 Week 6: June 5 - 7 Why is the Fitness Month Challenge 6 weeks long? The Challenge is 6 weeks long in celebration of National Fitness Month in May and ends with Global Running Day on June 7, 2023. What is the Fitness Month Challenge T-shirt? A first-of-its-kind celebration commemorating the Fitness Month Challenge, we are offering members who complete any of the 6 mini-Challenges the option to purchase an exclusive Fitness Month Challenge T-shirt. Please note: we are sorry, but the Fitness Month Challenge T-shirt is not available to international iFIT members. If I do not purchase a Fitness Month Challenge T-shirt, will I still receive a digital reward? Yes. You will receive a digital reward for completing any and/or all of the Fitness Month Challenge mini-Challenges. When will I get the link to order a Fitness Month Challenge T-shirt? Your Challenge completion email to order will arrive by Monday, June 12, 2023. When is the deadline to order a Fitness Month Challenge T-shirt? The deadline to order is Friday, June 23, 2023. When will my T-shirt arrive? You can expect the T-shirt to arrive within 4 weeks after the deadline. Disclaimer: This blog post is not intended to replace the advice of a medical professional. The above information should not be used to diagnose, treat, or prevent any disease or medical condition. Please consult your doctor before making any changes to your diet, sleep methods, daily activity, or fitness routine. iFIT assumes no responsibility for any personal injury or damage sustained by any recommendations, opinions, or advice given in this article. Always follow the safety precautions included in the owner’s manual of your fitness equipment.
May 8, 2023

Join Us for the Oregon Gran Fondo!
We’re kicking off the summer season with an exciting bike race with iFIT Trainer Travis McCabe! We couldn’t be happier to bring the iFIT Community together for this event in beautiful Oregon. In true Gran Fondo fashion, this race is a fun and accessible ride for all fitness levels, from beginners to racing pros! Travis will lead the way through this scenic gravel ride with climbs and descents that will keep you on your toes. Meet iFIT Trainer Travis McCabe A self-described “spandex cowboy,” Travis McCabe is a professional cyclist and Arizona native living in Florida. Travis discovered his love of road biking early on and launched his impressive cycling career at just 19. Over the next 13 years, he traveled the world and went on to earn more than 21 professional wins in the U.S. and abroad! As your iFIT Trainer, Travis loves to see the joy people experience upon reaching their goals. When he’s not on his bike, you can find Travis backpacking and playing with his dachshunds! How it works On Saturday, June 11 at 10:00 a.m. ET, you’ll join iFIT Trainer Travis McCabe on your iFIT-enabled bike or the iFIT app on your smartphone or tablet. This race will also be rebroadcast the same day at 8 p.m. ET. Your speed is up to you: race to make this your fastest ride to date or keep it casual for a fun time with the iFIT Community. As a 26-mile race, the Oregon Gran Fondo will take approximately 1 hour and 45 minutes to complete. Find the pace that’s right for you so you can finish strong. After participating in this Live Race, you’ll receive your digital reward in your Trophy Case! The Oregon Gran Fondo will be posted in the iFIT Library a few days after the event, so you can revisit this exciting bike race whenever you’d like! Joining the Live Race Join Travis on your iFIT-enabled bike or the iFIT app on your smartphone or tablet on Saturday, June 11 at 10:00 a.m. ET. This race will be filmed on June 4, then broadcast on June 11, 2022, at 10:00 a.m. ET so the iFIT Community can complete the ride together. Train for the Race To make it to the finish line of the Oregon Gran Fondo, you can prepare ahead of time with Travis McCabe! Join him in beautiful Spain for the Mallorca Performance Series, where you’ll work on your endurance as he pushes you through 12 intermediate and advanced rides. Expect interval training, challenging climbs, and unforgettable views! Digital reward Race bib Download and print your race bib From your iFIT Community Join the iFIT Community Disclaimer: This blog post is not intended to replace the advice of a medical professional. The above information should not be used to diagnose, treat, or prevent any disease or medical condition. Please consult your doctor before making any changes to your diet, sleep methods, daily activity, or fitness routine. iFIT assumes no responsibility for any personal injury or damage sustained by any recommendations, opinions, or advice given in this article. Always follow the safety precautions included in the owner’s manual of your fitness equipment.
May 13, 2022